Sunday, August 29, 2010

"Iris and Forsythia" complete

This afternoon I sat out on the deck on this beautiful late summer day and finished adding color to the linoleum print I've been working on and sharing with you.  Here's the way it looked last time as a black and white print....

                                                                 
And here is the finished product....


Iris and Forsythia
hand colored linoleum print - 9" x 12"

I think the color really brings the flowers to life.  I had forgotten how waxy and blendable Prismacolor colored pencils are but they allowed me to play back and forth with colors and values almost as if I were painting.  Completing this piece is motivational to me in continuing with the series.

Monday, August 23, 2010

Printing an Edition

I have finished cutting the printing plate I talked about last week and have printed "Iris and Forsythia".  It's always exciting to see what that first print will look like because despite lots of planning, it's always a bit of a surprise....


Partially cut soft cut printing plate

In order to print, I gather up my materials and head to the kitchen to be near the sink and to use the counter to spread out my work.  


Inking the printing plate

I roll out the black Speedball water soluble block printing ink with a 4 inch wide soft brayer, making sure that there is an even coat on the whole surface of the linoleum.  It's easy to see where the ink is because it is shiny and black.  Some of the cut areas pick up ink too and I like the value and textures the lines create.  I have to be careful NOT to get any blobs of  ink on the brayer or they will fill in the incised areas on the plate.


The inked plate with tape for centering the print on the paper

Next, I move the printing plate over to where I have measured out rough masking tape guidelines for the printing plate and paper so that the prints will be consistently centered.  In this case, I don't have to worry about being too careful.  If I were using a multiple number of plates or doing a reduction print where I would print the same plate several times, I would have to construct a more elaborate registration box.


Rubbing the print

When the paper is centered on the plate, I use a wooden spoon to carefully rub the back of the paper to make sure all areas of the plate have printed.  Here, you can just make out the ink beginning to soak into the paper.  I usually peek underneath to make sure it looks good before I pull the print off the plate.


"Iris and Forsythia"
9" x 12" • linoleum print

And here it is, the first finished print, called the "Artist Proof".  It is meant to be a test print and if I am pleased with it and it needs no more cutting, it becomes the standard for the edition.  I want each of the prints to be as exactly the same as possible and I might discard any that do not meet this standard.  But, in this case, I'm pretty pleased.  I do think that if I had treated both ferns as I did the one on the right, the print would be more balanced in terms of black areas.  When I add color this print after it is dry I will be able to compensate for this if I choose to do so.
I pulled 13 prints today and after printing 6 of them I had to take time out to wash and dry the plate since it had gotten pretty scummy.  I intend to print some more later.  The prints need to dry completely and that can take several days in humid weather.   Then, when there's no chance of smudging, I will have the fun of hand coloring one using colored pencils....

Monday, August 16, 2010

Painting an Abstract

One night at a party, someone asked me, “How do you know how to paint an abstract painting?” It was an overwhelming question for me, but this week I thought I might try to answer it from my own humble experience....

The elements and principles of design are important in any kind of artwork, whether it is two or three dimensional, abstract or realistic, because they organize the composition. But in an abstract work, the elements and principles and the visual idea are all that the artist has. If there is anything recognizable, it is altered--abstracted--until it may be simply a suggestion of reality. So, the success or failure of the piece depends heavily on the merits of its composition.

The elements of design include: line, shape, size (scale), texture (surface quality), color and value (darkness and lightness). The principles of design are the ways in which the elements are organized and include: balance, repetition, rhythm, contrast, harmony, movement and unity. Some folks might add or subtract a term or two or perhaps use somewhat different terms but these are the basics. In truth, how well the elements and principles of design are utilized in communicating the feeling or message of the work, determines how successful any piece of art will be.

When I begin an abstract painting, I have in mind a visual idea I want to play around with--it might be the chaos of a nebula...

Eagle Nebula #2

or the feeling of being drawn toward the light of morning...

Land of Light

I am very aware of the elements and principles as I organize the painting. Using thick, thin and directional lines and repeated shapes, I try to create a sense of rhythmic movement. I choose appropriate textures and think about patterns of contrasting darks and lights and how they balance. I decide where to locate the focal point and how relatively large and small shapes will be. The color palette I choose will add or detract from the harmony and unity of the piece. There's a lot of thinking and intuiting going on in this process, and it is both absorbing and challenging. Each choice made is an attempt to move the work closer to the little imaginary, abstract place I want to create. It takes a lot of time and practice to become fluent enough to move easily through this visual world. But it never gets old and it never stops being a fascinating challenge.

Friday, August 13, 2010

In-process Soft Cut Linoleum Print


For the past several weeks I've been working on the linoleum prints I mentioned way back in March.  In fact, I spent last Friday night at Tip Top Open Studios cutting away on my soft cut linoleum and visiting with Larissa from across the hall.
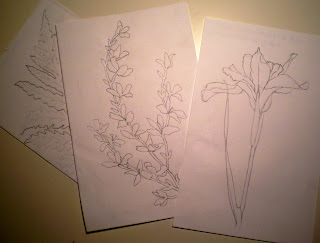
The first step in making a print is making drawings, in this case, pencil sketches of flowers.  It's a good time of year to be doing this!  I have many small drawings--pansies, forsythia, iris, day lilies, clover, black eyed susans, daisies, many un-named wild flowers I've found on our morning walks.  Plus lots of sketches that just don't want to work.
For this print, I chose forsythia, iris and ferns to play with in making a design....


Flower pencil sketches

After the drawings are chosen, the next step is creating a pleasing composition for the print.  This means tracing the sketches with a some tweaking here and there.   For example, some sections of the sketches may be repeated for emphasis.  I try to balance what will be cut out of the block to leave the paper white and what will be left to hold the ink and print black.  I want to have some black, some white and some textured gray.  I often add leaves, vines, stems, etc. to fill in empty areas.... 


Final design on tracing paper

The final design for the print is transferred to the soft cut block in pencil and then Sharpie marker to clearly mark the places that will and will not be cut. 


Partially cut soft cut block

The printing plate above is almost finished.  Hopefully you can see the marks of the linoleum cutter in the background.  These will be important when the plate is printed, adding texture to the negative space.  Next week?  Hopefully the finished product!

Thursday, August 5, 2010

A Quechee Field in July


It's been awhile since I've posted and I cannot say I have a good reason/excuse for that.  Putting the house on the market?  Maybe.  Vacation?  For sure!
But I have been out painting and here is the most recent large landscape.


"July Field, Quechee"
acrylic

Since I painted this, the field has been mowed and the wild flowers too.  Still, my love for these bountiful, beautiful fields is not diminished and August and September remain...